REVIEW · MAUI
Maui Jewelry Making Class with Puka Shells and Pearls
Book on Viator →Bookable on Viator
Making jewelry on Maui feels personal fast. In a small studio class with Mona Lisa, you create a real wearable souvenir—puka shells or pearls—while learning how the materials and findings work. I love how hands-on the instruction is and how Mona Lisa tailors help to your comfort level, not the fastest hands in the room. One possible drawback: at $180 and about two hours, it’s not a grab-and-go activity, so you’ll want to commit to actually finishing your necklace.
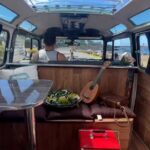
This is set up for a relaxed evening in Kihei, in a beach-area studio right off South Kihei Rd. You’ll start with Hawaiian fruit snacks and tea/coffee, and the studio allows BYOB, which makes the whole thing feel more like a creative hangout than a rushed workshop. The class also caps at 6 travelers, so you’re not lost in a crowd.
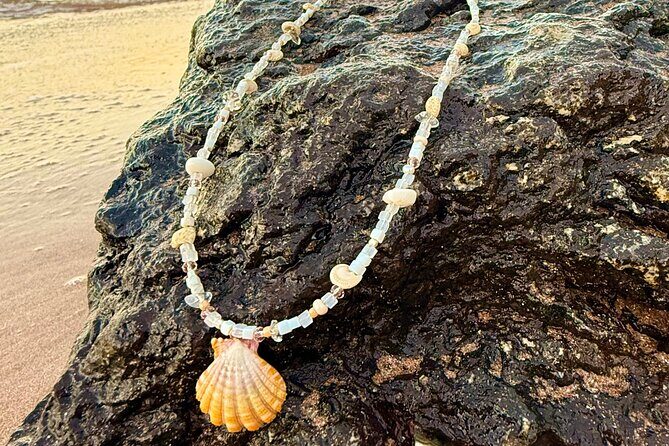
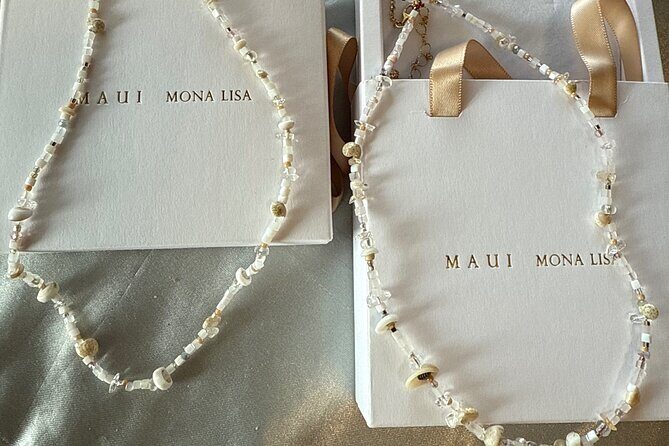
You’ll choose between two kit styles: pearls (with options for gold or silver metalwork) or a puka-shell kit with options like 14K goldfill or sterling silver chain and wire, plus a Maui Mona Lisa gift box. If you finish with time, you can usually make a second necklace from extra supplies.
In This Review
- Key Highlights You’ll Care About
- Maui Mona Lisa Jewelry Making Class in Kihei: What the Evening Is Like
- Pick the Right Kit: Pearls with Magnetic Clasp vs Puka Shell Necklace
- Option A: Pearls (Tahitian and fresh water) with cord + magnetic clasp
- Option B: Puka Shell kit (14K goldfill or sterling silver chain and wire)
- Can you bring your own shells?
- Meet Mona Lisa: How One-on-One Guidance Actually Works
- Your 2-Hour Timeline: From Hawaiian Context to a Finished Necklace
- Start: refreshments + Hawaiian background
- Step 1: learn your materials
- Step 2: build the first necklace
- Step 3: optional second necklace if you have time
- What You’re Really Paying For: $180 Worth It?
- Logistics: Where It Is, When It Runs, and How to Prepare
- Who Should Book This (and Who Might Not)
- Should You Book Maui Mona Lisa for Your Maui Souvenir?
- FAQ
- What jewelry kit options are available?
- How long is the Maui Mona Lisa jewelry making class?
- Where does the class start?
- Are refreshments provided, and can I bring drinks?
- What is the maximum group size?
- Can I get a full refund if I cancel?
Key Highlights You’ll Care About
- Two kit choices that shape the final look: pearls with cord and magnetic clasp, or puka shells with chain and wire options
- Small group class (max 6) for real attention and quick corrections
- BYOB-friendly studio with Hawaiian fruit snacks, tea, and coffee
- Tailored instruction based on your experience level, from first-timers to more hands-on crafters
- A take-home gift box so your finished piece is ready to share or wear right away
- One-on-one help with tools, technique, and the little tricks that prevent common mistakes
Maui Mona Lisa Jewelry Making Class in Kihei: What the Evening Is Like
Picture this: you show up to a beach-location studio in Kihei, take a seat, and immediately shift from vacation mode to maker mode. The vibe is easy, friendly, and focused. The whole class is designed around getting you to a finished piece without turning it into a test.
You’re not herded into a big room. The class runs with a small cap of up to 6 people, and that changes everything. You get room to ask questions, your instructor can spot issues early, and you’re more likely to leave with something that actually looks like you planned it.
Before you touch tools, you’ll settle in with Hawaiian fruit snacks plus tea and coffee. The studio also allows BYOB, which matters if you like your creative activities with a little atmosphere. I’d treat it like a relaxed creative night out: bring something you can sip calmly while you work, and keep things simple.
Another nice detail is how the session starts with Hawaiian context. You’ll get an introduction to Hawaiian history related to puka shells and pearls, then you move into the materials and jewelry findings. It’s not just craft-for-craft’s-sake. The lesson gives your necklace meaning, even if you’re only half paying attention while you’re threading or wiring.
You can also read our reviews of more tours and experiences in Maui


Pick the Right Kit: Pearls with Magnetic Clasp vs Puka Shell Necklace
The biggest decision is the kit you choose. Both options end with a wearable necklace and a gift-ready presentation, but they feel different in your hands and on your neck.
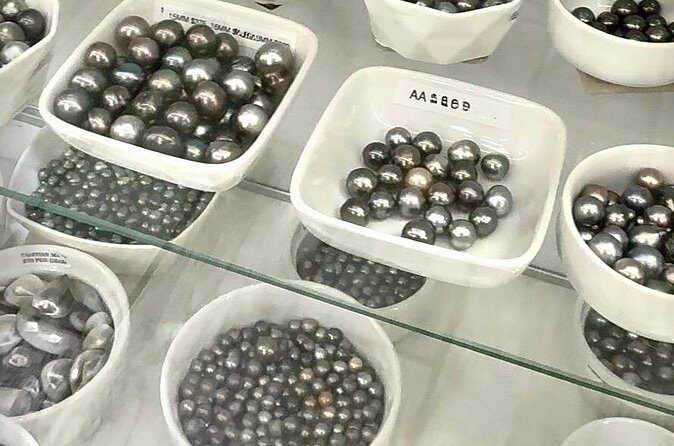
Option A: Pearls (Tahitian and fresh water) with cord + magnetic clasp
If you like a clean, classic look, the pearl kit is the one. This kit uses Tahitian and fresh water pearls, paired with cord and a magnetic clasp option. You can choose the jewelry metal to match your style: gold or silver.
This kit feels good if you want something that looks polished without a lot of fiddly technique. It also tends to work well as a gift because pearls read as timeless to nearly everyone.
Option B: Puka Shell kit (14K goldfill or sterling silver chain and wire)
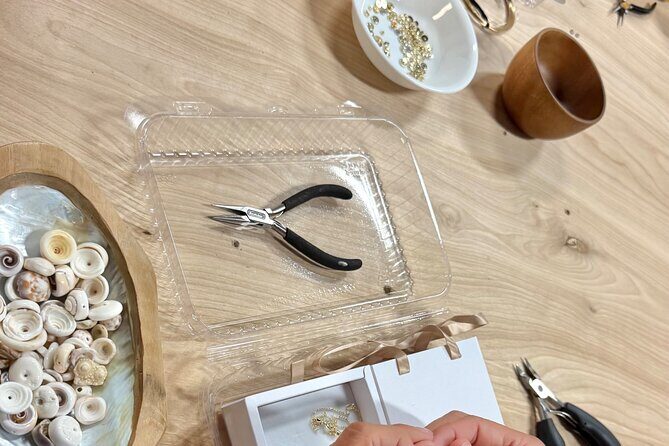
If you want that beachy, island texture, go puka shells. The puka shell kit comes with a choice of 14K goldfill or sterling silver chain and wire options, plus the parts you need to build your necklace.
There’s also something special about the sourcing story here: Mona Lisa gathers the puka shells herself from the ocean. Even if you don’t follow shell details closely, knowing the shells come from her own ocean collection adds real meaning to the finished piece.
Can you bring your own shells?
One of the standout pieces of practical info from real experiences: some people bring shells they’ve gathered on Maui, and Mona Lisa works with shell options that let you create something one-of-a-kind. If you’re planning to collect, I’d do it thoughtfully—then ask early in the class how your shells fit the design you want.


Meet Mona Lisa: How One-on-One Guidance Actually Works
The teacher makes the difference with a jewelry class. Here, the instructor is Mona Lisa, and the instruction style is a clear theme: she guides you step by step, then adjusts for your skill level.
If you’ve never made jewelry before, you don’t get left behind. If you’ve done crafts before, you still get help on the trickier steps—like tool use, getting the right tension, and preventing pieces from looking crooked or unfinished.
You’ll learn the core building blocks: how to work with pearls or puka shells, what to pay attention to in jewelry metals and findings, and how to use the tools correctly. The goal is not just to make something. The goal is to learn the process so you can make a better version next time.
And yes, there’s creativity in the room. People come in with their own taste—layering ideas, metal preferences, a gift concept for a daughter or partner—and Mona Lisa helps shape what you make into something that fits your personality. That’s why so many people describe the necklace as a lasting memory, not just a souvenir.
Your 2-Hour Timeline: From Hawaiian Context to a Finished Necklace
Even with a creative craft, you need structure. This class runs about two hours, and it’s built so you can finish at least one necklace. Here’s how the flow typically feels, in plain terms.
Start: refreshments + Hawaiian background
You’ll begin with a short Hawaiian-themed introduction that connects pearls and puka shells to place and culture. Then you settle into the workshop portion with snacks and tea/coffee. If you chose to bring drinks, you’ll likely do it during this early stretch, while the class gets rolling.
Step 1: learn your materials
Next comes the materials lesson. You’ll look at the components in your kit and learn how the parts work together. For pearls, that means understanding cords and the magnetic clasp concept. For puka shells, it means understanding the chain/wire setup and how to position shells so the necklace hangs right.
This is where beginners usually relax. Once you understand what each part is doing, your hands stop guessing.
Step 2: build the first necklace
Then you start assembling. Mona Lisa leads and supports you through each step. The help is practical: adjust, try again, and use the right tool for the job.
A key detail is that she doesn’t treat the class like a one-way demo. You can get one-on-one corrections as you go, which helps you avoid the common mistakes—like rushing a step, using the wrong angle, or ending up with a clasp or connection that doesn’t sit where it should.
Step 3: optional second necklace if you have time
After your first necklace comes together, you may get the chance to create a second necklace using extra supplies from your kit, if time allows. This is a big value point. It turns the class into something closer to a full creative session rather than a quick one-and-done.
Not everyone will have enough time for the second piece, but if you’re enjoying the process and you work at a normal pace, it’s a nice option.
What You’re Really Paying For: $180 Worth It?
At $180 per person, you’re paying for more than materials. You’re paying for instruction, a guided pace, and a finished result that looks good enough to wear or gift.
Here’s how the value stacks up:
- You get a complete kit for your chosen style, plus a Maui Mona Lisa gift box
- You’re not doing it alone. Mona Lisa actively helps with tools and technique
- Small group size means your time with the instructor is real, not shared at the speed of a large workshop
- Refreshments are included: Hawaiian fruit snacks, tea, and coffee, plus BYOB is allowed
Then there’s the sentimental value. Many people like this because the piece feels tied to Maui in a way store-bought jewelry doesn’t. Even one experience described these pieces as wearable for ocean time, which matters if your travel style is beach-first.
One more practical value point: this type of class is most satisfying when you treat it like a mini craft project. If you want to leave with a necklace you made yourself—something you’ll actually wear again—this price starts to feel fair.
Logistics: Where It Is, When It Runs, and How to Prepare
You’ll meet at 1021 S Kihei Rd, Kihei, HI 96753, and the activity ends back at the meeting point. It runs during a broad window: 3:00 PM to 8:00 PM, Monday through Sunday.
The long-day timing matters because it fits most Maui schedules. Morning is for beaches and hikes; late afternoon and evening are for something indoors and focused. If you want this as your first “Maui activity” day, just plan your day so you’re not rushing afterward.
Two other logistics details that are worth knowing:
- You’ll receive a mobile ticket after booking, and confirmation is sent at the time of booking
- The class is in English
Also, this tends to sell. On average, it’s booked about 26 days in advance, so if you have a specific date or you’re traveling with a small window of availability, book ahead rather than hoping.
What to bring is simple: bring your curiosity and your idea of what you want to make. If you’re bringing anything to match your style—like preferences for gold vs silver—decide early so you can start fast.
Who Should Book This (and Who Might Not)
This class is ideal if you want a hands-on souvenir with personal meaning. It’s especially good for:
- Couples who want a shared activity and a take-home keepsake
- Friends or small groups who enjoy making things together
- Anyone buying for a family member because you’ll create something that feels intentional
- First-timers who need clear, step-by-step help
It’s also a strong fit if you like learning while you create. The class includes Hawaiian history around pearls and puka shells, so you leave with context, not just craft steps.
You might think twice if you’re looking for a quick, passive experience. This is making jewelry, so you’ll be working with tools and small components. Also, if $180 feels steep for a craft souvenir, check whether you’re planning to actually wear or gift what you make. If you’ll likely keep it as a display piece only, you might prefer a lower-cost souvenir option.
Should You Book Maui Mona Lisa for Your Maui Souvenir?

I think you should book this if you want a necklace that feels like yours. The small group size and Mona Lisa’s one-on-one guidance are the real reason to choose this over a generic craft stop. You’re not just assembling parts—you’re learning how to use materials and findings, so your final piece reflects your taste.
I’d especially recommend it if you like pearls or puka shells and you want something tied to Maui that doesn’t feel mass-produced. The gift box is a nice bonus, and the optional second necklace can turn your session into a bigger win.
My only caution is time and budget. Plan for the two-hour session to be focused, not half-done, and make sure the $180 price matches how you personally value instruction and finished results.
If you want a creative evening that gives you a wearable memory, this class is a solid bet.
FAQ
What jewelry kit options are available?
You can choose between two kits: a pearl kit with Tahitian and fresh water pearls using cord and a magnetic clasp, with gold or silver metal options, or a puka shell kit with 14K goldfill or sterling silver chain and wire.
How long is the Maui Mona Lisa jewelry making class?
The class lasts about 2 hours (approx.).
Where does the class start?
The meeting point is 1021 S Kihei Rd, Kihei, HI 96753, USA, and the class ends back at the meeting point.
Are refreshments provided, and can I bring drinks?
Tea and coffee and Hawaiian fruit snacks are provided, and the studio allows BYOB.
What is the maximum group size?
The maximum group size is 6 travelers.
Can I get a full refund if I cancel?
Yes. You can cancel up to 24 hours in advance for a full refund. Within 24 hours of the start time, the amount paid is not refunded.